04/29/2001
Putting together my first thoughts on the floor and wall
tile.
Ceramic Tile References
|
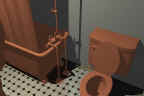
First rough test of the floor
tile texture map. The floor is mapped in parametric mode.
For more information on this
method, check Bill Munn's tutorials.
I chose to use Bill's technique
because I want to precisely control the pattern of the tiles
on the floor and keep the polygon count as low as possible.
The map was generated from a
series of 2D surfaces, created in Rhino then imported and colored
in Bryce.
|
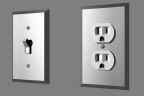
04/28/2001
The installed hinge, "Astoria" door knob and some
electrical fixtures.
Michelle has been shopping for wallpaper. Our little talk
about breaking out of the search frame before sending the
link seems to have gone very well. She found a wallpaper she
liked called "Rosebud" but lost the link (before
we had our little chat).
Psyche had an issue this morning but fortunately I think
it was related to Outlook trying to keep track of two years
worth of email messages. It seems to be feeling better now.
Wallpaper References
[Interesting, I like the walls page 2,
'Adam's Gold', I think I forgot we are not rich, 'Urban Decay',
I need to scale back to simpler tastes? It is no longer safe
for me to be cruising the net, I find too much stuff. "I
need supervision". I lost 'rosebud', but believe me,
I'll find plenty. Hey how do you like the shorter link?]
I keep thinking that originally I figured I'd just browse
around the web, grab some stuff, throw it together and be
done. Sometime during the "Astoria" door knob I
realized this was not to be the case. Still, it's interesting
and I'm perfecting many techniques and skills along the way.
|
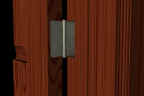
I had to use fine art anti-aliasing
to bring out the detail on the hinge that was lost on normal
AA.
As a general rule, I also keep
the gamma correction turned off.
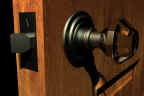
Just for kicks I used an image
mapped texture on the door here mapped in world cubic mode.
These is a scaling problem with this mode that will hopefully
be fixed in the next release.
The original material was too
light so I set the ambient color to black and increased the
ambience slider to about 25 to darken it.
If this were a finished scene
I'd have to adjust the texture offset to move the seam above
the door knob out of view.
You have to be very careful
about smoothing in Bryce. I like to use the 3DS file format
so smoothing is a fact of life. If you use the Wavefront OBJ
format, it won't be as much of an issue. I prefer 3DS because
it can handle much more complex objects.
In the picture above, only the
radial trim piece between the shaft and the door was smoothed.
Below, only the outlet itself. I used a smoothing angle of 22
degrees. Any more caused deformations, any less left visible
facets. You have to experiment but the general rule is only
smooth when it's absolutely necessary.
A good set of dial calipers
makes modeling these kinds of objects easy.
|
04/27/2001
Ok, hinge complete. Did I really spend a day messing around
with this?
Good news, "the Michelle" decided on the "Astoria"
door knob instead. With any luck, the entire room will be
finished by the end of the weekend. Unfortunately, the weather
is supposed to be perfect so I'm not making any promises.
|
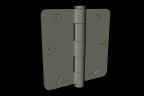
On the door, I used material
rotation and translation to visually separate adjacent elements.
Since this won't work with the
hinge material, I had to leave tolerance gaps in the model to
separate the elements. At this scale, I used a 0.01" gap.
|
04/26/2001
I'm trying to talk her out of the solid brass "Sunburst"
door knob and into something a little simpler like a nice
lead crystal one.
That's a very small picture ("Sunburst") to work
from for so much detail. Meanwhile, I think I'll finish up
the hinges.
We're still working on those nasty wallpaper links.
|
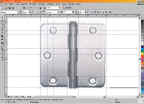
Here's a trick. There was a
great picture of a hinge on the site but no dimensions.
I saved the image then loaded
it into Corel Draw 9, scaled it to 3-1/2 x 3-1/2 as in the description,
then used the guidelines to directly measure any of the dimensions
I needed.
From this top view, and knowing
how a hinge works, it's easy to construct an accurate model.
|
04/25/2001
Getting the small details right is important. It takes an
image from "that's nice" to "wow". You
can't spend too much time of the details.
The basic dimensions for the door were taken from the material
posted on the second reference site. I'm not sure why anybody
else on the planet would care about these dimensions but I
certainly found them helpful.
Michelle is picking out wallpaper and looking at paint chips
today. We didn't get time at work but we're going to have
to have a little chat on the proper way to email a link. I'm
sick of cutting and pasting those 30 mile long links.
Plus I've still got to figure out how to model her choice
in door knobs tonight.
This is already the most complex model I've ever built, and
I haven't even started on the primary room yet. I've taken
to doing detailed work in a separate CAD file then merging
the result into the master file because the P2-450 machine
I primarily use for CAD design is getting a little sluggish
with the size of the file. Both are also busy running tests
on the Bryce5 beta software as well.
Rule #1, you can't have the computers running too many things
at once. That said, I think it's time for an upgrade.
|

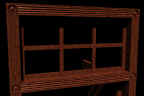
The wood part of the door is
organized into four groups. Two vertical, and two horizontal
(and one vertical and one horizontal for the trim between the
panel and the door frame).
The horizontal frame elements
had their texture rotated z=90. The adjacent trim elements had
their textures offset by an arbitrary amount to keep them from
blending with the frame.
To show the contrast,
the door behind is a single monolithic object.
The texture itself breaks down
a little in a view this close. It'll need a little work before
it's ready for the finished scene.
|
04/24/2001
Interior Door References
[Designer Doors, first choice #5501, standard
4 panel. Second choice, #5527, horizontal 5 panel.]
|
|
04/23/2001
A sketch of the woodwork details per "the Michelle"
specifications. The materials have to be scaled a little more
accurately but that can't be done until the entire model is
complete.
Woodwork References
A little more work to finish up the details on the door and
a few other little touches and this model is complete.
The polygon count is getting very high, it's starting to
worry me. It may be necessary to mesh some of the NURBS objects
to simplify the model.
|
I changed the mapping in Tony's
original material to world cubic. Since the scale in this mapping
mode depends on the overall size of the model, it won't be possible
to correctly scale the material until the entire model has been
imported.
On the horizontal pieces, I
changed the rotation to Z=90 to make the grain appear to run
with the length of the wood. Actually, these details are grouped
according to the wood grain and I had to rebuild some elements
for easier texturing.
Since Tony's materials are procedural,
I've got a lot of flexibility without having to worry about
pushing a bitmapped texture too far or having tiling problems.
|
04/21/2001
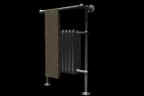
As I'm finishing up the details on the radiator (excuse me,
towel warmer), I'm thinking ahead and looking for examples
of the woodwork and details around the door. I know, the towel
could be a bit more fluffy.
Interior Woodwork
[Several things, one I'm narrowing my housing search,
I have to stick with my original plan of an older home after
viewing these links, I'm inspired! The restoration of the
Queen Ann, and the Victorian home are wonderful.
Okay I got off track, you can understand? The wood trim
I see in the bathroom is in Cumberland & Woodcraft, wood
doors and window-casings, #750. I don't know if the picture
is clear enough though, you do have the hard part!
Have a good day, if you don't watch the game, at least
have a beer at 3:00 to cheer the Flyers on!]
|
 |
04/19/2001
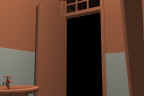
The recreated bathroom sketch after a minor mishap with the
meshes.
Fortunately, there are many examples of this style of architecture
in my area. The layout, proportions and details are coming
from memories of my sister's first apartment and her current
house in the Victorian style, and my grandmother's house,
a WW2, 30's era row home.
Unfortunately my sister no longer lives in that West Chester
apartment, her current house has been remodeled and my grandmother's
house was sold after she died.
The door and woodwork are incomplete and there should be
a cast-iron radiator and/or towel warmer in the corner with
or without an enclosure.
General Reference Links
If you're working in an unfamiliar area, there's nothing
like the web as an instant resource.
|

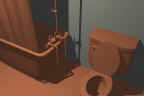
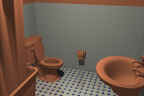
These incredible bathroom fixtures
were created by Anthony Hernandez (aka) Nosfiratu and were found
on Renderosity. The door, floors, walls and ceiling are examples
of elements that I have to model myself.
While I'm developing a model
I occasionally export the whole darn thing into Bryce to make
sure there aren't any problems and to do a quick reality check.
In this case it was a good idea
since one of the meshes was causing some serious problems. So
much so that I had to throw the entire model away and start
over. Fortunately, it didn't take long to reconstruct.
The Poser scale figure has been
hidden in these views.
Raw models are scaled anywhere
from 3,000% to 10,000% after importing to get a good balance
of camera field of view with material scale.
|
04/15/2001
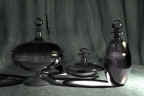
Some objects found on the web that might fit the period.
I'm having trouble getting started because there are so many
possibilities so I decided to start with a bathroom that will
probably be mostly out of view in the finished image.
The process of working through and thinking about a simpler
room gets my head into the scene and makes finding and organizing
the objects in the bedroom easier.
[First impression, Floor lamp, wood chair, mirror, traditional
wine bottle, I like the cigs, but we'll have to see if they
work.]
|
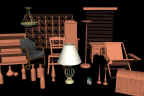
The web is a great resource
for models. Unfortunately, they'll be in a dozen different formats
and scales. The worst is to find a really great model in an
incompatible style.
|
04/14/2001
An initial sketch of the bedroom.
This is a project I'm doing with my (executive) assistant
Michelle. She fell in love with the concept of John's Urban
Breeze, but also had other ideas she wanted to incorporate.
Rather than torment John, I suggested we collaborate. The
only rule was that there was to be no timetable. It's actually
working out well since I tend to get stuck perfecting the
smallest details. At that point, she'll kick me and get me
moving again.
Any male who has ever helped any female move should recognize
this familiar phrase "err, I think I'd like that heavy
thing on the other side of the house". So I'm doing all
the hard work (but still much easier than in real life), she's
doing the directing on this one.
The scene is set in a contemporary urban apartment with Victorian
architecture.
I decided to keep a record of our progress just for fun,
to exchange info with Michelle, and maybe to serve as a workflow
tutorial to new users.
[I agree the desk is too large, I'm not sure if the chair
is too small (depends on future desk), I like the book, but
maybe open, maybe open and face-down, she just left it to
look out the window. I love the bed, dresser, and her pose.
The desk lamp, not sure, out of position with the dresser,
maybe an older lamp (Victorian?).]
|
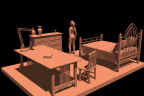
All of the "web found"
objects are imported into Rhino, scaled, positioned and
finally, organized into layers by material type. Any additional
elements are modeled and the finished model is exported to Bryce
using the chunk method described in the tutorial section.
I also generated a P4 Poser
figure, exported it and welded it into a single mesh. When I
imported it into Rhino, I scaled it to 5'6". During the
development of the model, it's a handy tool for estimating the
scale of objects.
When the model is complete and
everything has been imported into Bryce I'll get rid of the
scale figure and replace it with a figure exported directly
from Poser. I also frequently walk around my house with a tape
measure to make sure I've scaled things properly.
If you setup the pose first,
and use that as your scale figure, you can use the "copy
matrix" and "paste matrix" commands in Bryce
to make the process easier.
|
|
