05/29/2001
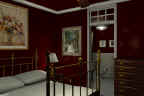
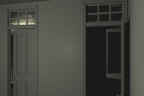
I was rather pleased with the way the mirror came out but
the bed linens need some work. The first attempt to create
a material was not a complete success. I was trying for Victorian
lace and ended up with a truly excellent concrete material
instead. The mesh is rough and difficult to work with so I
may end up creating a whole new one. The frame is pretty good,
so I'll keep that.
I'm also thinking Steve
Cox's UVMapper might be a good way to go for these objects.
Bryce's parametric mapping is better for these soft, organic
shapes anyway.
|
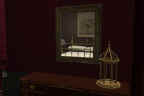
I used a similar technique as
with the pictures but this time I replaced the picture with
a reflective surface and kept only the frame.
Usually the rule of thumb is
that diffusion plus reflection should equal 100. Here I set
the diffuse color to white and set diffusion to about 40 with
reflection at 100. This gives a little haze to the reflection,
more like an antique mirror rather than the shiny new Windex
variety.
|
05/28/2001
Haven't counted for a while ... thought it might be fun (it
wasn't really).
- 2418 objects
- 3,624,483 polygons
- 385MB file size
And Bryce, not holding up badly. Not blinding me with it's
speed but, overall, holding up.
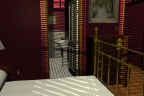
Finished the blinds so now I'll take a look at some of the
smaller details.
|

|
05/26/2001
The Finch Dilemma
First off, big thanks to Captain Bob for these most excellent
finch reference pictures. They should make building that finch
quite a lot easier. Jonathan pointed me to a somewhat generic
songbird
model from DAZ. I could create some morph targets for that
model or just start from scratch and build a new model as
a NURBS object.
I haven't quite decided which way to go yet but I'll probably
learn a lot more by building my own in Rhino so I'm leaning
in that direction.
From the Artistic Director
Michelle fired off a reference link for the bed linens before
she took off for the long weekend. I also found a great resource
for furniture models (better late than never).
It should be relatively simple to create some image maps
from these examples. She also decided there should be a mirror
over the dresser and a blue crystal vase and some small family
photos on the chest of drawers, dust ruffle on the bed ...
and blinds, the big old hard to wash kind like grandma used
to have.
... er, ya want fries with that honey?
I also had one evil thought. Perhaps the radiator on the wall
is a mistake. A short, small radiator in front of the window
would make more sense.
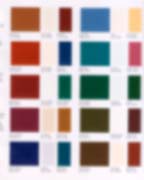
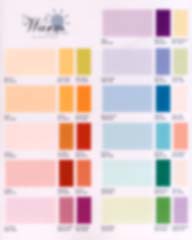
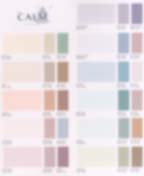
Virtual Painting
That default white on the doors and woodwork was starting to
bother me so I headed down to Home Depot looking for some paint
chips and found these great idiot-proof color guides.
I scanned the guides at a relatively low resolution but high
color depth then gave them a 4 pixel gaussian blur in Photoshop
to smooth out any surface roughness picked up by the scanner
and average out the color in the chip. Using the eyedropper
tool with the color palette open it's easy to convert the colors
into RGB values for Bryce.
I grouped all the wall, woodwork, door and ceiling elements
into families so that I could select them easily and make sure
that the materials I applied were consistent.
On the walls, I'm using a bump channel to simulate the character
of the plaster. The color goes into the diffuse channel with
diffusion set to 100%. I'm also using the specularity channel
to simulate the finish in all groups.
- Ceiling - flat, no specularity
- Walls - eggshell, 50% specularity
- Woodwork and doors - gloss, 100% specularity
Bryce's texture model really makes this easy once you're comfortable
with the basics of how the model works. A side benefit is that
these simple materials tend to render quickly.
If you think about it, paint companies spend huge amounts of
money to come up with these color combinations for the decoratively
challenged masses (people like me). You can skip all this and
just eyeball these things but consistent color, finish and surfaces
add subtle but important detail to the finished image.
Just for fun I'll run out a few different combinations and
let Michelle pick the final color scheme later. Since we're
trying to convey a feeling of sweltering heat, one of the warm
combinations would be the best choice. We'll reinforce the feeling
with the figure (the way she's dressed, pose and texture) but
the colors in the room should also support that feeling.
It's a good thing ...
Sorry, still just winding out of Martha Stewart mode here.
Corel has given permission to the beta testers to publicly post
images created with Bryce 5 though we're still not allowed to
discuss the new features. I was rather hoping for this since
some of the new features will make a big difference in these
images.
|
| |
Deep Aubergine
(117/30/50) |
| |
Parchment
(240/217/199) |
| |
Antique
Gold (161/90/29) |
| |
Forrest
Floor (66/58/24) |
| |
Wedding
White (251/245/246) |
| |
Chippendale
(89/38/37) |
| |
Day Star
(254/170/68) |
| |
Vanilla
(255/205/169) |
| |
Colorado
Dawn (249/132/31) |
| |
Soft Wheat
(218/175/156) |
| |
Daydream
(249/220/214) |
| |
Dusty Canyon
(177/140/131) |
|
05/23/2001
Good news. Mercury is rumored to be in the gentle hands of
UPS at this very moment. I could sure use that extra horsepower
about now.
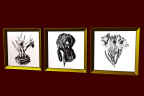
While I was finishing up the cage I went ahead and moved the
picture and added a matte to each of the ink drawings. I guess
it's about time to get some texture on that bed and the floor
needs a little help too.
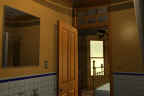
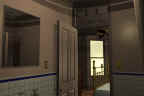
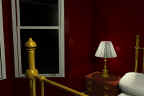
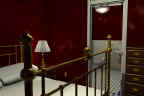
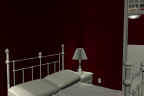
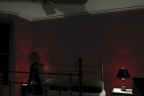
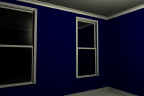
I also played around a little with the lighting. This is much
closer to my original idea for the "look and feel"
I'm aiming for in this one.
|
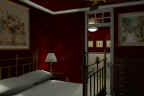
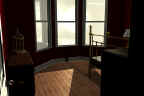
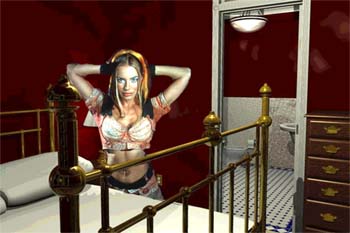
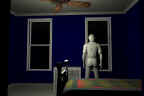
The bird is a stand-in. I'm
waiting for some reference material from my seester.
In the second and third views
there is a single spotlight (pretending to be the sun) illuminating
the scene. There is also one omni light with it's shadows off
in the center of the room to bring up some ambient light. I
really prefer this approach to setting the ambience channel
in the materials.
Render times are still running
under 10 minutes even in volumetric mode. Go figure.
|
05/22/2001
Ok, I can live without the VCR selection controls. As long
as I don't try to use them in other than solo mode, Bryce
stays in one piece. Enough said.
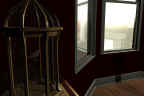
I think the bird cage is coming along nicely. Reasonably
close to the original.
Just need a door, perch and a boid yet. Everything was pretty
straightforward except for the wires in the upper section.
That was interesting.
|
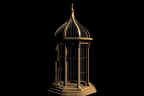

Modeling from a low quality
picture is really just a matter of developing an eye for proportions.
It's generally not too difficult if you have the overall dimensions
to work from and have some sense of the way the object is put
together.
|
05/21/2001
Ask anyone, patience is not one of my virtues.
Are you getting the hint that Bryce was behaving badly today?
It took over an hour to get Psyche going again after the power
failure last night while I was at work. Fortunately Cupid
has more of a golden retriever personality.
The Bryce gods are truly angry again. I exchanged a few messages
with Bill
Munns (check the bio, who knew?) and he said he's worked
on projects in the 30MP range. Beta guy says he's done 26MP
and we're falling apart here at 3MP. Something is funky.
Then I went browsing over to take a closer look at the Flamingo
gallery (3rd picture down on the right). It seems they've
made an awful lot of progress since the early beta I saw several
months ago.
Things To Do Today
- Set v4 aside and import the model again on the off chance
that this file is still corrupted.
- Download Rhino 2.0 beta and the Flamingo beta and see
how much progress they've really made.
In the meantime, I'll continue to add the small details I've
collected from the web to the model.
Persistence however, is one of my virtues.
|
|
05/20/2001
| Love that Chicken from Popeyes
• You'll dig the way it's fried • Feels so good inside
• The best you ever tried |
Don't mind me. Just having a moment. I haven't had decent fried
chicken since I moved out of Philadelphia. The store was in
a bad section so we used to have to travel in large groups through
Powelton Village to get there. Fifteen years later who knew
they'd open up in the food court of the mall? Getting through
the mall traffic is no less dangerous but a little less stressful.
Life is good.
Back to "work". I'm pretty pleased with the pictures
but I'm wondering:
- Should the smaller picture be over the chest of drawers
maybe.
- What the heck should be on the wall opposite the large picture?
I had the thought that I could scan some of the People's
Light and Theatre artwork to look like a theatrical poster.
I like the idea but I'm not sure it'd work here.
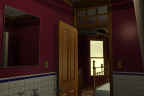
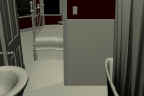
I started tweaking the materials in the bathroom and finally
figured out what the gunk on the back tile was. Turns out, it
was the wall. Somehow I shifted the back wall over the tile.
That was really bugging me. There was also a small alignment
issue with the metal fixtures.
I did get all the tile work done but now I'm not sure about
the three pictures in the back. They need to be cleaned up a
little. Still, not a bad day's work. All that detail and not
one additional polygon.
I also found a couple new things on the web that might work
in the bedroom. Still have to get going on the bird cage (an
owl stand would have been much easier).
|
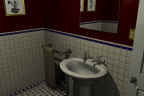
The artifacts on the back wall
were due to an alignment problem. Both the tile and the wall
surfaces were positioned at the same Y coordinate. I fixed the
alignment in Rhino and imported the bathroom wall section again.
In a case like this Bryce will give you unpredictable results
in the final render.
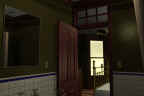
I created three tile patterns
in Rhino. One for the floor (object top), one for the North-South
walls (object front) and one for the East-West walls (object
side).
To keep the scale consistent
I laid out the tile just as I would in the real world. Though
it's much easier this way, less messy and quite a lot cheaper.
I imported the tiles into Bryce
in groups making it easier to play with the final colors. I
set the grout surface 0.01 BU under the other tiles to minimize
the shadow effects. After Bryce rendered the tiles, I saved
the image then opened the current scene and applied the new
materials to the tile surfaces.
|
05/19/2001
The Bryce gods are truly brooding and angry today. At one
point, Bryce was having an issue and I accidentally saved
a corrupted version of the scene over the last good copy.
I was however, able to coax one last image out of the corrupted
file.
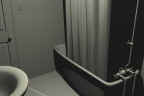
On the brighter side, while I was coaxing, I added the mirror
in the bathroom and made good progress on the revised floor
tile map for the bathroom (all in Rhino).
I did have to scale the large picture over the bed by about
75%. This is so much more convenient than real life. Usually
you find a great picture and most times, it's too big or too
small for where you want to put it and isn't available in
any other size. As a general rule, pictures should be centered
vertically at eye level.
Michelle has good taste in pictures ... eh?
:)
Issue resolved ... I think. I think the problem was related
to a Bryce issue with PSD files. Out of habit I tend to save
images in Photoshop format. Now I remember some talk about the
PSD import filter having some problems but I never paid much
attention because I never ran into it. I finally deleted the
picture objects I just added and everything seems to be fine
again. Now that the Bryce is stable, I'll try remapping the
pictures using the BMP format. I had to go back to Photoshop
to fix the Moiré patterns anyway.
|
I noticed some Moiré interference
patterns on the pictures when rendered in normal AA. The images
were scanned at 300dpi, at that resolution, the scanner is resolving
the individual dots that make up the printed image.
I'll have to go back to Photoshop
and apply a slight Gaussian blur to the original scans to fix
the problem.
|
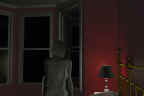
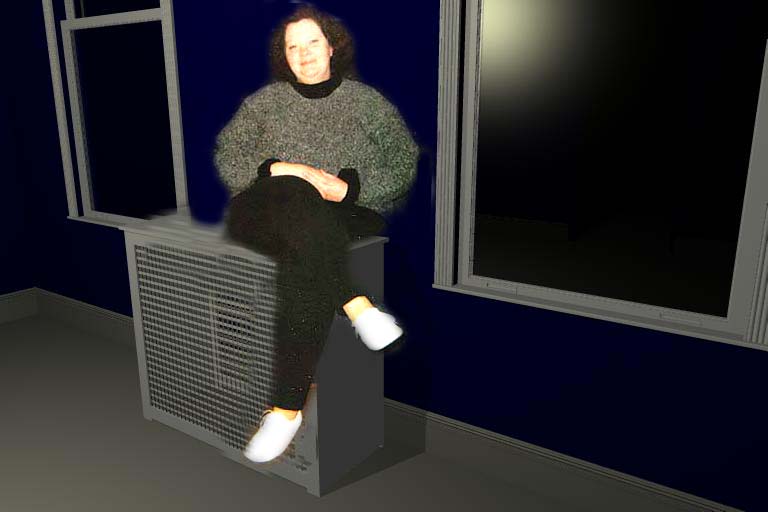
05/18/2001 PM
I replaced the last image with a fine art AA version that
I let run while I was at work. I'm seeing a pretty dramatic
improvement in the image quality.
Mike has again been adjusting my hard work to suit his own
tastes. Normally that would earn him a retroactive pay cut but
he did such a great job with an Internet auction this week he's
earned a couple "get out of retroactive pay cut free"
cards. Actually, Xev
looks pretty good in this scene (the scale is a little off)
... I'll have to run it past Michelle but somehow I don't think
she'll go for it.
We had a pretty interesting discussion about pictures for the
walls and bird cages this afternoon. I still didn't find a picture
(of the bird cage) that was quite what I had in mind but I did
find a couple things that looked like they belonged in the scene.
I still think the owl would be better but, she's the boss.
We agreed to move the bird cage away from the radiator a bit
to avoid a repeat of one of Michelle's rather unpleasant childhood
experiences.
Small Details
The second link is a real gold mine for details that'd fit
nicely into this scene. Anybody know where I can pickup a finch
model ... cheap? I also found a book and a couple magazines
from the Chester County Book Company that are right on target.
I can't believe how easy it is to find reference material on
this style.
It was interesting that both Michelle and Helen looked at the
first image I posted this morning and immediately (and independently)
"recognized" it as being just like their grandmother's
bedroom.
Fortunately, the weather is supposed to be unpleasant this
weekend so we should make pretty good progress.
|

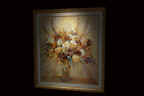
I got a catalog from Brushstrokes
last week. Turned out to be just the thing. They show their
paintings in a head on view, just perfect for Bryce.
I scanned the images then created
a frame in Rhino that approximated the size in the catalog then
mapped the scanned image onto the solid model using object front
mapping.
In these images I also generated
a bump map by desaturating and setting the lightness +10 and
the contrast +25 (in Photoshop).
I used a similar technique for
the three ink drawings. Those were scanned from a book called
Victorian Floral Illustrations. You can find lots of
these type of art and craft books at a good bookstore. This
book was left over from a calendar project I did several years
ago.
For these, since I didn't have
a frame, I created a simple one, a plane of glass and a plane
for the scanned image.
I also added a paper like texture
(bump channel) to these.
Image map techniques like this
are a quick and easy way of adding detail to any image.
|
05/18/2001 AM
Not really happy with any of my options I came up with plan
D. A low calorie version of the model. Not quite as crisp
as the original but not too bad and it's workable on my current
hardware. I can always swap out the lo-cal elements later
if I want.
- 1407 objects
- 2,976,650 polygons
- 274MB file size
Good enough to at least get some preliminary textures on
the model.
The shadows are too harsh but I won't replace the single
light sources with cluster lights until I'm finished. It looks
great but keeping the render time down is the most important
thing right now.
These metal materials are just minor variations on the Bryce
preset metals. I picked up Jonathan's
Seriously Real Metals last week and I'm anxious to see
how they look in this scene. It'll be interesting to see if
he's as good as I think he is with the Bryce DTE.
The materials need a lot of work yet and there is still the
bathroom mirror and the tile all has to be redone. Then it'll
be just a matter of integrating the figure, finishing off
the details and getting the final lighting in place.
|
The Rhino 3DS export filter
allows you to specify how the object mesh is generated. By adjusting
these settings I was able to cut polygons count in half and
still retain most of the detail..
Unfortunately, the lower polygon
count causes some faceting in Bryce. Once the model is imported,
I now have to spend extra time smoothing. I'm using a smoothing
angle of between 22 and 46 degrees in these images.
|
05/16/2001
PM ...
The beta team assures me that we are nowhere near the limit
so ... Plan A ... good to go.
Jim, who is better at Truespace than I am says Plan C is
good too but has a personal preference for Plan B until Plan
A becomes available.
Things are looking up!
AM ...
"Houston, we have a problem." I spent a couple
hours importing the model into Bryce. Here are the statistics
for the model to date:
- 1434 objects
- 6,870,798 polygons
- 637MB file size
With only about another million polygons to go to finish
the model, Bryce has already become too sluggish to use on
Cupid (800Mhz). It's now taking over a minute to perform the
simplest tasks (select an object). Too slow even to texture
the existing model (without prescription pharmaceuticals).
Rhino is still fine but it's working with a NURBS representation
and doesn't have to deal with the massive polygon count Bryce
does. Surprisingly, render times are still very reasonable.
It's decision time.
- Plan A - Throw more hardware at the problem
Within the next couple of weeks a new box (Mercury) should
be up and running. This one will be a 1.3Ghz Athalon which
may be enough to allow me to finish the project.
The problem today is that every geek on the planet wants
that ASUS motherboard and Craig got his order in a little
late. They are currently backordered with no ETA available.
- Plan B - The Breakup
I can close the doors and import the two rooms separately
ignoring all out of view objects. For the bedroom I'd only
need to import the walls, lights and crown molding for the
hall and bathroom. Since the original concept was for a
scene in the bedroom only, this still works with only a
slight diminishment. The model could be reassembled in it's
entirety if it becomes feasible in the future. Moore's law,
don't fail me now.
- Plan C - Infidelity
Switch to another renderer. Both TrueSpace and Rhino's beta
Flamingo are offering radiosity in their lighting model
... very nice to have for this scene. It's tempting, but
the price is that I would have to abandon Bryce's material
and volumetric lighting model. I'm also not very familiar
with either package and I've got no idea how much trouble
they'd be working with a Poser figure import. A project
this complex is also probably not the best way to break
in a new renderer and I'd have to abandon and recreate all
my material libraries.
A combination of plans A and C would probably be the best
choice overall but the most practical and expedient is a combination
of A and B.
I'm a little disappointed. Instead of seeing the (volumetric)
light at the end of the tunnel next week I'm now looking at
several more weeks before I can finish. I was rather looking
forward to seeing some preliminary textured views and working
on the fine details of the Poser model. Plan B seems to be
my best bet at this point but I think I'll take a little time
off and briefly explore the other options first.
Rats, I was really looking forward to adding that owl though
Michelle said she wanted a nice Victorian style bird cage
with finches instead. I thought the owl would have been much
cooler (probably a guy thing).
|
|
05/14/2001
I've opted to start with some of Tony's stuff first. His
stuff is pretty detailed and it'll help keep things moving
if I can avoid modeling all the furniture myself.
I'd rather spend more time working on the figure and some
of the other details. If you hadn't noticed, the Sarah character
I was working on back in February belongs in this series.
Once I'm finished with the basic model, I'll go back and
finish up work on the character.
|

|
05/13/2001
[www.uniquehomegifts.com
has great furniture, if you can get past the total cornball
home page.]
|
|
05/12/2001
Had to take a couple days off to deal with the real world
but things look like they are starting to settle down a little
so I can finally get back to work.
I think we'll be moving furniture this weekend so I thought
I'd better get the bay windows installed.
As we were reviewing our progress on Friday afternoon, Helen
pointed out that the baseboard is missing a piece of quarter-round
at the bottom (Helen does her own finish carpentry). I hadn't
really thought about it but, she's absolutely right.
I also noticed one or two other minor details that need polishing
so I'll clean those up then it's over to Tony's site to look
for furniture.
|
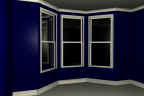
With each study I seem to keep
increasing the scale to get a good camera view. This one was
imported and scaled 10,000% with a 70 degree field of view..
It's a balance. I can always
increase the field of view angle in the camera settings but
if you go too far you get a fish-eye lens effect. I try to keep
the scale down because if I later decide to use image mapped
textures in world cubic mode, from past experience I know I
can get into trouble with the scale of the textures.
See, I knew there was a reason.
The wallpaper was made by applying a bump map to the basic material
in world cubic mapping mode.
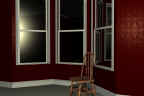
The chair presents a problem.
It's in a 3DS format with textures already applied. You can
import that directly into Bryce without any problems but you'd
have a heck of a time positioning and scaling it right. Rhino
1.1 on the other hand, doesn't support textures unless you use
the 2.0 beta.
The answer is, use both. Import
the chair, scale and position it in Rhino then export it to
Bryce. Later, you can use the copy matrix and paste matrix commands
to replicate the size and position of the untextured version
when you replace it with the one imported directly into Bryce.
Easy huh? Susan Kitchens turned
me on to that whole matrix thing. Now I use it all the time.
Thanks Susan.
|
05/09/2001
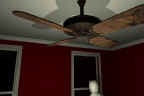
Found one, and fixed the glass.
I played with the textures a little on the fan. Originally
I had a shiny brass-n-glass look but after looking at the
fans in my house ... decided to go for the grunge.
The model is incredibly detailed but the textures will make
or break the final image. These textures are far from finished.
For the size of the room, I'm thinking maybe only a single
bed.
In the office ...
... or not
Mike from the office has seen fit to take a little artistic
license with study 14. This is not Michelle, it's Wanda, an
absolutely wonderful lady (in our opinion) who is currently
dating one of the other salesmen in the office. Wanda, we love
you, dump Steve, you deserve better. There's a lesson to be
learned here, never bring any personal photographs into this
office.
On a more serious note, Michelle is having a dilemma. Is the
apartment an urban high rise or a smaller building like those
in West Chester. If the latter, shouldn't there be three bay
windows instead of two flat against the wall?
|
Revised glass with a 0.005"
gap between the glass and the trim. Look ma! No artifacts!
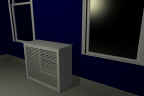
Rather than model the expanded
metal in the radiator enclosure, I used a transparency mapped
procedural material. Looks (polygon) expensive, doesn't it?
|
05/08/2001
The finished windows, baseboard and crown molding. The ceiling
fan I was planning to use turned out to be a little rough
for the level of detail we've got going here so I'll have
to find another.
|
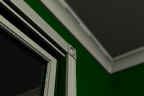
Definitely something funky going
on with the crown molding here. I'll have to take a closer look
at that later.
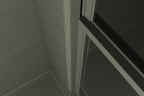
I also see some artifacts where
the glass meets the trim. This happens with Rhino objects in
Bryce where one of the objects is transparent. The workaround
is to simply adjust the size of one of the objects so that the
faces are no longer adjacent.
All in all, it's a good case
for test rendering while you're building a model.
|
05/06/2001
I imported the entire model to date into Bryce to see how
it would respond (828 objects, 3,200,523 polygons and a file
size of about 288MB before any of the elements were smoothed).
The model was imported in 28 separate sections.
So far so good.
I was curious how the model would react to light so I assigned
the glass materials and added three radial light sources.
One each in the bathroom, bedroom and living room.
Double hung, casement or awning?
[I liked the windows in the Avalon Window
Tour, the 1st page 1st picture, on the older brick building.]
I'm thinking two windows with a radiator in between.
"Consider everything in the nature of a hanging fixture
a weakness, and naked radiators an abomination."
Frank Lloyd Wright, 1902
Ok, maybe this time in an enclosure.
|

I tend to use a warmer light
color 255/255/225 rather than a harsh white light.
Obviously all lights should
have a source for a natural look to the finished scene but positioning
the light can sometimes be tricky.
In this case I selected the
glass in the bathroom light fixture then used "copy matrix",
created a new radial light then selected "paste matrix"
to position the light source.
An alternate method is to add
a sphere (or some other object) to the model and later use the
object edit menu to convert that sphere to a light source.
Reduce the shadow intensity
from the default 90 to around 50 to soften hard shadows and
give a more even lighting. These tests were rendered at 90.
In the finished scene I'll probably
replace each single light source with a cluster of 3 or 5 to
soften the edges of the shadows. Multiple light sources really
add to the render time so you have to use them wisely.
|
05/04/2001
Would you have thought it'd take 2.2 million polygons to
make this scene? I have have gone a little overboard but the
both Bryce and Rhino seems to be holding up so I'm planning
to keep on going until one of them cracks.
From the sketch I redrew the entire floor plan for the apartment
then extruded and grouped the walls (by room), created the
floor and ceiling surfaces and replicated the finished bathroom
door to the bedroom and the front door openings.
Still need to finish some woodwork and the pocket door in
the hallway along with some door hardware and a mirror for
the bathroom. Then we move on to the bedroom furniture.
And a hall light ...
Lighting References
Since Sylvia nipped the bed I found (first) off the Internet
for Cozy
In Brown I guess we'll just have to build a new one.
Bed References
[I like Serenity, Virginian, Peterborough.
(the second link) has lots of finish close ups if you need
them. I liked our original idea in wood, brass seems to be
more indicative the period, but I worry it will get 'lost'?]
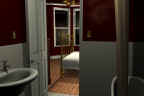
|
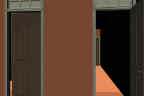
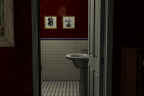
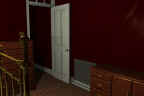
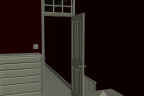
The view from the bedroom looking
towards the bathroom and hall.
The woodwork is using a very
large number of polygons. I had to import the doors, woodwork
and wall surfaces separately. Usually, at this stage I have
no problems importing the entire model as a whole.
|
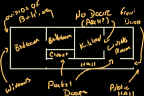
05/02/2001 PM
Ok, I lied. Got more done than I thought I would. The basic
floor plan. One bedroom apartment, very small. We were kicking
this floor plan around all morning on the whiteboard ... and
working.
I'm not planning to complete the entire model , I really
only need the bathroom, bedroom and hall (don't need the kitchen
or living room right now) but it's nice to know what's happening
on the other side of the wall. (?!)
|
 |
05/02/2001
The bathroom is nearly complete. No picture today, but soon.
I organized the model into layers by material, getting it
ready to export and texture in Bryce. Some of the elements
of the model are not finished (some tile, crown molding, mirror,
small details) but it's easy to add those later IF the overall
size doesn't change.
I'll take a little time and block out the other rooms now.
If I don't I'll have to reload and retexture everything when
the other rooms are added. I probably should have done this
earlier but it's still not a problem if I do it now. I'm already
thinking of views and camera angles and I'll need the other
rooms because they'll be mostly but not completely out of
view. In the finished scene, it'll be this room that's mostly
out of view. I'm also a little concerned about the interaction
of light through the window over the door.
I could also just create a much larger bounding box than
I need for this room but sketching out the other rooms will
also help to develop the ideas we have for them.
As a side benefit, if the entire model gets too complex,
I have the option of splitting it up into several files (in
Rhino) while maintaining the precise alignment of objects
(in Bryce). That is IF I have the final size for the bounding
box.
|
|
05/01/2001
The finished floor tile mat, well almost. It seems I started
with the wrong bounding box for the floor so this image map
doesn't correctly fit the floor surface.
Guess it's "throw it all away and start over time".
Measure twice, cut once.
Just as well, there were a few minor things I wasn't entirely
happy with anyway.
|
 |
|


)